A simple, intuitive way to post code. Thank you, GitHub!
Wednesday, December 18, 2013
Monday, August 12, 2013
SPICE: Improved UX On CentOS 5 KVM Guest
As you probably know, KVM is a great way to run virtual machines on a Linux host. It may not be as refined as VMware Workstation, but it's very close. And it's open source.
Not all of guest VM's need to provide a graphical desktop like Gnome. But when they do, SPICE is one of the protocols you can use to access it. Like RDP, PCoIP, and VNC, SPICE is a remote desktop access protocol. I use the term "access" instead of "display" because all of these protocols provide more than just a display output channel. They also provide input channels for serial devices such as keyboards and mice.
Electrical engineers: don't confuse the SPICE protocol with the SPICE circuit emulator.
When the guest is configured correctly, the serial channels provide seamless mouse traversal from the host to the guest, and allows cut-paste between the two. Without these channels, you can't paste text into the guest from the host and you have to use keyboard escape sequences to release the mouse from the guest.
In short, it's fairly annoying if you have a need to switch quickly between the two environments.
When running newer Fedora, CentOS, and Red Hat guests on a newer host, SPICE input channels just work. But if you need to run CentOS/RHEL 5.x, it doesn't. Not "out of the box", anyway. So here's how.
I'm working with CentOS 5.9. After installing the base OS on the guest, follow these steps.
Things should start working at this point. When I first got everything configured, it didn't. I'm not sure what fixed it (logout? screen save?) but it's OK now. The mouse cursor is a little clunky compared to the experience on newer guests, but cut/paste is OK and I don't have to use a magic key combo to release the mouse.
Not all of guest VM's need to provide a graphical desktop like Gnome. But when they do, SPICE is one of the protocols you can use to access it. Like RDP, PCoIP, and VNC, SPICE is a remote desktop access protocol. I use the term "access" instead of "display" because all of these protocols provide more than just a display output channel. They also provide input channels for serial devices such as keyboards and mice.
Electrical engineers: don't confuse the SPICE protocol with the SPICE circuit emulator.
When the guest is configured correctly, the serial channels provide seamless mouse traversal from the host to the guest, and allows cut-paste between the two. Without these channels, you can't paste text into the guest from the host and you have to use keyboard escape sequences to release the mouse from the guest.
In short, it's fairly annoying if you have a need to switch quickly between the two environments.
When running newer Fedora, CentOS, and Red Hat guests on a newer host, SPICE input channels just work. But if you need to run CentOS/RHEL 5.x, it doesn't. Not "out of the box", anyway. So here's how.
I'm working with CentOS 5.9. After installing the base OS on the guest, follow these steps.
- Install the Feodra EPEL repo configuration. (Note that the domain name may be different than what you see here.)
rpm -i http://mirror.nexcess.net/epel/5/i386/epel-release-5-4.noarch.rpm - Install the SPICE vdagent.
yum install -y spice-vdagent
- Verify that the vdagent is enabled to start at boot time.
chkconfig --list|grep spice
My host is running Fedora 17. If you're using virt-manager to access your desktops, then you don't really need the SPICE client (it's built in to virt-manager). But if you just want to connect with the 'spicec' command, then yum install spice-client.
If you're accessing the desktop from the network, you need to make sure that SPICE is configured to listen on the right network interface. By default, it only listens on 127.0.0.1. In a production environment, your choice will depend on security requirements. In a lab environment, I usually set this to 0.0.0.0 so I can get to the desktop from anywhere.
If you're accessing the desktop from the network, you need to make sure that SPICE is configured to listen on the right network interface. By default, it only listens on 127.0.0.1. In a production environment, your choice will depend on security requirements. In a lab environment, I usually set this to 0.0.0.0 so I can get to the desktop from anywhere.
Monday, August 5, 2013
Making ISO Files and Burning CD's
Need to create an ISO image of some directory contents and burn it to a CD or DVD? Here's how I do it on Fedora/RHEL/CentOS.
In (overly) simplistic script form, the making of an ISO9660 image goes like this.
The Rock Ridge protocol (-R) and Joliet fileystem (-J) options specify extensions to the ISO9660 standard that help with OS compatibility. Rock Ridge adds POSIX file capabilites for Unix-compatible systems, and Joliet improves Windows compatibility.
The -T option adds a translation table to each directory, which further enhances compatibility on both Windows and Linux systems.
The remaining options are fairly obvious. The volume ID (-V) can be up to 32 characters. You might want to avoid whitespace for easier use on Unix systems, but it's not a requirement.
The other strings for application ID (-A), publisher, preparer (-p), are descriptive strings that can be up to 128 characters.
If you don't specify an output file or device (-o), the output will be written to stdout.
If you choose to write to a file, you can use cdrecord (a symlink to wodim on newer versions of Linux) to burn a CD. You'll need to know the name of the device file for the optical writer on your system. It's usually /dev/cdrom, /dev/dvdwriter, or something similar.
The command I use to burn CD's and DVD's is
In (overly) simplistic script form, the making of an ISO9660 image goes like this.
#!/bin/bash
contents="path/to/files"
isodir="path/to/empty/dir"
isoimage="my-image.iso"

mkdir $isodir
cp -a $contents $isodir

mkisofs -R -J -T \
    -V "VOLUME_ID" \
    -A "Description of the contents" \
    -publisher "The Company, Inc" \
    -p "Another Company, Inc" \
    -o $isoimage $isodir
The Rock Ridge protocol (-R) and Joliet fileystem (-J) options specify extensions to the ISO9660 standard that help with OS compatibility. Rock Ridge adds POSIX file capabilites for Unix-compatible systems, and Joliet improves Windows compatibility.
The -T option adds a translation table to each directory, which further enhances compatibility on both Windows and Linux systems.
The remaining options are fairly obvious. The volume ID (-V) can be up to 32 characters. You might want to avoid whitespace for easier use on Unix systems, but it's not a requirement.
The other strings for application ID (-A), publisher, preparer (-p), are descriptive strings that can be up to 128 characters.
If you don't specify an output file or device (-o), the output will be written to stdout.
If you choose to write to a file, you can use cdrecord (a symlink to wodim on newer versions of Linux) to burn a CD. You'll need to know the name of the device file for the optical writer on your system. It's usually /dev/cdrom, /dev/dvdwriter, or something similar.
The command I use to burn CD's and DVD's is
cdrecord dev=/dev/cdrom my-image.iso.
Thursday, July 25, 2013
Email with Mutt
It's been a long time since I used a plain-text mail reader from the command line in Linux. I was surprised to see that mutt on Linux worked so easily -- with a secure Microsoft Exchange Server, even!
After installing the 'mutt' package with yum, I simply ran mutt. Then I connected to my company Exchange server.
After installing the 'mutt' package with yum, I simply ran mutt. Then I connected to my company Exchange server.
- Press 'c' to connect
- Enter IMAP server. For example, imaps://exchange.company-intranet.com
- Accept the certificate if you think it is valid
- Enter your user name and password
Wednesday, June 19, 2013
Accessing services on KVM guests behind a NAT
I have a small web service running on a Fedora 17 VM. The VM lives on the default virtual network provided by libvirt, which allows outbound connections to the external world. But because the IPv4 space for that network (192.168.122.0/24) is private, the host's iptables rules will NAT all packets on their way out.
That means "no way in" for external connections. The virtual network addresses are unseen (unroutable) to the outside world.
Luckily, libvirtd provides hooks so that you can insert custom operations at key points in the start-up/shut-down phases of a guest. The following procedure shows how to create a hook to modify iptables when a guest is starting (or stopping).
As an exercise, I rewrote the sample script in Python, adding some logging and removing some redundancy along the way.
Note that, depending on the version of libvirtd you are running, the hook may not process "reconnect" operations -- i.e., when libvirtd is restarted. You need 0.9.13 or later for that. If you have an earlier version, you may have an issue with duplicate rules.
I left those operations out of the Python script because my Fedora 17 system is running 0.9.11.
Cheers!
That means "no way in" for external connections. The virtual network addresses are unseen (unroutable) to the outside world.
Luckily, libvirtd provides hooks so that you can insert custom operations at key points in the start-up/shut-down phases of a guest. The following procedure shows how to create a hook to modify iptables when a guest is starting (or stopping).
- On the host, create a new file called
/etc/libvirt/hooks/qemucontaining this sample script. (There's a link to a more comprehensive script if you need it. I also wrote a Python replacement below.) - Replace the placeholder variables in the sample script with the guest name, addresses, and ports that are to be forwarded.
- Restart the libvirt service.
- Verify new DNAT rules with
iptables -nvL -t nat.
As an exercise, I rewrote the sample script in Python, adding some logging and removing some redundancy along the way.
#!/usr/bin/env python
#!/usr/bin/env python
import argparse
import logging
import subprocess
import sys

guestAddr = { 'f17-base':'192.168.122.200' }
hostPort = { '80':'8000', '22':'222' }
logFile = '/var/log/qemu-hook.log'
logLevel = logging.DEBUG

logging.basicConfig(filename=logFile, level=logLevel, format='%(asctime)s : %(message)s')

parser = argparse.ArgumentParser()
for arg in [ 'guest', 'op', 'subop', 'extra' ]:
    parser.add_argument(arg)
args = parser.parse_args()

logging.debug('qemu hook: guest %s, op %s' % (args.guest, args.op))
if args.guest not in guestAddr:
    logging.debug('Nothing to do for guest %s' % args.guest)
    sys.exit()

if args.op == 'start':
    natOp = '-A'
    filterOp = '-I'
    opStr = 'Adding'
elif args.op == 'stopped':
    natOp = filerOp = '-D'
    opStr = 'Removing'
else:
    logging.debug('Nothing to do for op %s' % args.op)
    sys.exit()

for gport in hostPort.keys():
    # build the nat command
    natcmd = ['iptables', '-t', 'nat', natOp, 'PREROUTING']
    gAddrPort = "{}:{}".format(guestAddr[args.guest], gport)
    natcmd += ['-p', 'tcp', '--dport', hostPort[gport], '-j', 'DNAT', '--to', gAddrPort]
    logging.info('%s nat rules for %s' % (opStr, gAddrPort))
    subprocess.call(natcmd)
    # build the filter command
    filtercmd = ['iptables', filterOp, 'FORWARD']
    filtercmd += ['-d', '{}/32'.format(guestAddr[args.guest]), '-p', 'tcp']
    filtercmd += ['-m', 'state', '--state', 'NEW']
    filtercmd += ['-m', 'tcp', '--dport', gport, '-j', 'ACCEPT']
    logging.info('%s forwarding rules for %s' % (opStr, gport))
    subprocess.call(filtercmd)

logging.info('iptables update complete')
sys.exit()
Note that, depending on the version of libvirtd you are running, the hook may not process "reconnect" operations -- i.e., when libvirtd is restarted. You need 0.9.13 or later for that. If you have an earlier version, you may have an issue with duplicate rules.
I left those operations out of the Python script because my Fedora 17 system is running 0.9.11.
Cheers!
Fixed DHCP addresses in libvirt
The libvirt DHCP service can deal out fixed IP addresses. Yes, you could simply configure the guest OS with a static IP, but that's beside the point. A DHCP service should be able to handle fixed addresses and, earlier in the game, I didn't think libvirt was capable of it. But it is!
Just add a
Of course, this same principle applies to other virtual networks. The reason I doubted it at first is that virt-manager 0.9.5 doesn't expose this level of customization in its GUI.
Everything you need to know about network configuration can be found at libvirt networking.
Just add a
host element to the default network XML file using virsh net-edit default.<network>
<name>default</name>
<uuid>5c0448c7-4240-4325-9a80-eb9f575c962e</uuid>
<forward mode='nat'/>
<bridge name='virbr0' stp='on' delay='0' />
<mac address='52:54:00:BE:58:83'/>
<ip address='192.168.122.1' netmask='255.255.255.0'>
<dhcp>
<range start='192.168.122.128' end='192.168.122.254' />
<host mac='52:54:00:c9:06:c5' name='router122' ip='192.168.122.200' />
</dhcp>
</ip>
</network>
Of course, this same principle applies to other virtual networks. The reason I doubted it at first is that virt-manager 0.9.5 doesn't expose this level of customization in its GUI.
Everything you need to know about network configuration can be found at libvirt networking.
Wednesday, April 24, 2013
The Dilettante's Git Cookbook
I use Subversion at work, so I don't use git regularly enough to remember these little things.
Undo and Redo a Commit
First, understand how the git index works. Here's a good intro from the GitGuys.
Now, to undo a commit and redo it (from StackOverflow).
$ git commit ...              (1)
$ git reset --soft HEAD^      (2)
$ edit                        (3)
$ git add ....                (4)
$ git commit -c ORIG_HEAD     (5)
- This is what you want to undo
- This is most often done when you remembered what you just committed is incomplete, or you misspelled your commit message, or both. Leaves working tree as it was before "reset".
- Make corrections to working tree files.
- Stage changes for commit.
- "reset" copies the old head to .git/ORIG_HEAD; redo the commit by starting with its log message. If you do not need to edit the message further, you can give -C option instead.
Throw Away/Stash All Changes
This is something you might want to do when you’ve pushed changes to your upstream repo that are better than what you have in a (different) downstream. In other words, you started something in a repo A, finished it in B, pushed from B, and now you don’t care about unfinished changes in A.You can use
git checkout . to forget all changes for tracked files, but it won’t get rid of any untracked files that you don’t want. Be careful! It doesn’t ask before blowing away all unstaged changes.
A better approach might be to just stash the changes.
git stash save --keep-index
You can use the
stash list and stash apply commands to see your stashes and bring them back. Or they can be removed permanently with git stash drop.Interactive Staging
It's time to end my practice of committing gobs of unrelated changes just because I'm too lazy to pick them out and separate them. I didn't realize it was so easy.
git add -p
It's that simple. You can choose which changes (called hunks in the context of patching) that you want to stage for the next commit.
This is useful if you started working on a new change but forgot to commit the previous work.
Get the full story on interactive staging from Scott Chacon's free Pro Git book.
Repo Visualization with GitWeb
Although I have a github account, there are other work-related projects that require the use of an internal git repo. I bounce around between different machines at the office, so it's nice to have a master repo that I can get to from anywhere.
I found GitWeb to be very easy to set up. I already had Apache httpd running on my workstation, so a simple
To my surprise (well, not too surprised given the way my brain works), I found that the git project directory
Anyway, I didn't have to do much other than to restart the httpd service. Once I did, I could browse to
Note that GitWeb only provides the ability to visualize your repositories in a browser. It's not a vehicle for git operations like cloning and pushing. See the next section for more info on that.
yum install gitweb added the necessities.To my surprise (well, not too surprised given the way my brain works), I found that the git project directory
/var/lib/git already had stuff in it... from a year ago! The rpm -qf /var/lib/git command showed that the directory was owned by the git-daemon package. The daemon wasn't running and my current research gave me reasons not to run it, so I removed the package.Anyway, I didn't have to do much other than to restart the httpd service. Once I did, I could browse to
http://myworkstation/git and there were my projects. Cool!Note that GitWeb only provides the ability to visualize your repositories in a browser. It's not a vehicle for git operations like cloning and pushing. See the next section for more info on that.
Remote Repo Access With SSH
For small groups of Linux users, SSH access to git is an easy way to go.
- Created bare repositories for each project
- Copy the bare repo's to /var/lib/git on the server
- Create a git user account on the server
chown -R git:git /var/lib/git- Add the user public keys to
~git/.ssh/authorized_keys
Once you've done that, all users are free to clone from and push to any project using the git account. Their commit messages will have the correct user info since that information is based on git configuration and not SSH login name.
For larger groups and project-specific access, Gitosis is the next step.
If you just want to clone a repo from one machine to another (which I like to do just for backing up trivial repositories), just use git clone node:path/to/repo.
For larger groups and project-specific access, Gitosis is the next step.
If you just want to clone a repo from one machine to another (which I like to do just for backing up trivial repositories), just use git clone node:path/to/repo.
Friday, April 19, 2013
Stop Using FTP!
The legendary File Transfer Protocol has served us well over the years, but it's time to put the old horse out to pasture.
One of our technical support guys, through no fault of his own, wasted many hours of his own and other people's time trying to figure out why an innocuous looking shell script would not execute.
The script is executed from within a complex enterprise management application. Because we could not execute it in a simple terminal command line environment, and because there are several constraints on how the script is named and installed, we did countless iterations to try to isolate what wasn't working.
We did comparison runs on other systems with similar scripts, we injected debug output, we double-checked SELinux file contexts, and we stared a lot. There was no sign that the management application was even attempting to run the script. No errors either. It's like the script wasn't there.
Finally, it occurred to me to just write a new script:
We installed the new script with the prescribed procedure, prepped the system, and repeated our test.
It worked. Finally, we were on to something. There was something in the original script that was causing problems. Something invisible.
I ran
"Where did you get the script from?" I asked. I knew what he was going to say.
"One of the developers emailed it to me."
"And how did you transfer it onto the test system?"
"With scp."
"How did the file get onto the host where you transferred it from?"
"Jack copied it there for me. I mailed it to him, he saved the attachment, and then he FTP'd it to the server from his desktop."
Good grief. What a route for a file to take. Jack overheard the conversation and walked over.
"What kind of file transfer program did you use to get this script onto the server, Jack?"
"I used FileZilla on my Windows box."
Memories of writing FTP code back in the mid-90's came flooding back. So did memories of DOS-style line endings. And so did FTP's well-meaning attempts to make life easier for those who transfer files between different operating systems.
I explained to them that FTP is really not a good protocol to be using in a modern Linux world -- especially a world where Microsoft products live. FTP programs can and will alter file contents to be compatible with the receiving OS. Unix systems want lines to end with a single "newline" (linefeed) character, whereas DOS/Windows uses the "carriage return + newline". A holdover from the bygone days of the line printer.
An FTP program can be explicitly told what to do, but casual users often don't bother. The result can be confusing.
FTP probably still has its niche uses. Anonymous FTP servers that don't require users to authenticate with plaintext passwords might be acceptable. But that brings up the issue of running yet another process on an open port that could be exploited. I recommend that you just use scp (on Linux) and something like WinSCP on Windows.
Let's leave FTP to graze in fields of tall grass.
One of our technical support guys, through no fault of his own, wasted many hours of his own and other people's time trying to figure out why an innocuous looking shell script would not execute.
The script is executed from within a complex enterprise management application. Because we could not execute it in a simple terminal command line environment, and because there are several constraints on how the script is named and installed, we did countless iterations to try to isolate what wasn't working.
We did comparison runs on other systems with similar scripts, we injected debug output, we double-checked SELinux file contexts, and we stared a lot. There was no sign that the management application was even attempting to run the script. No errors either. It's like the script wasn't there.
Finally, it occurred to me to just write a new script:
#!/bin/bash
echo hello
We installed the new script with the prescribed procedure, prepped the system, and repeated our test.
helloIt worked. Finally, we were on to something. There was something in the original script that was causing problems. Something invisible.
I ran
od -bc on the original script so I could see the binary representation of the file. There it was: ASCII carriage returns before the linefeed characters.0000000 043 041 057 142 151 156 057 142 141 163 150 015 012 145 143 150
# ! / b i n / b a s h \r \n e c h
0000020 157 040 150 145 154 154 157 015 012
o h e l l o \r \n
0000031
"Where did you get the script from?" I asked. I knew what he was going to say.
"One of the developers emailed it to me."
"And how did you transfer it onto the test system?"
"With scp."
"How did the file get onto the host where you transferred it from?"
"Jack copied it there for me. I mailed it to him, he saved the attachment, and then he FTP'd it to the server from his desktop."
Good grief. What a route for a file to take. Jack overheard the conversation and walked over.
"What kind of file transfer program did you use to get this script onto the server, Jack?"
"I used FileZilla on my Windows box."
Memories of writing FTP code back in the mid-90's came flooding back. So did memories of DOS-style line endings. And so did FTP's well-meaning attempts to make life easier for those who transfer files between different operating systems.
I explained to them that FTP is really not a good protocol to be using in a modern Linux world -- especially a world where Microsoft products live. FTP programs can and will alter file contents to be compatible with the receiving OS. Unix systems want lines to end with a single "newline" (linefeed) character, whereas DOS/Windows uses the "carriage return + newline". A holdover from the bygone days of the line printer.
An FTP program can be explicitly told what to do, but casual users often don't bother. The result can be confusing.
FTP probably still has its niche uses. Anonymous FTP servers that don't require users to authenticate with plaintext passwords might be acceptable. But that brings up the issue of running yet another process on an open port that could be exploited. I recommend that you just use scp (on Linux) and something like WinSCP on Windows.
Let's leave FTP to graze in fields of tall grass.
Thursday, April 18, 2013
Linux System Init: The Case of the Disappearing CD-ROM Device
The software created by my company requires a two-step installation process with a reboot in between. First, you install the base operating system from a CD. Then you reboot and install the product software from another CD. (There's a reason for doing it this way, but it's not relevant here.)
After installing the base OS, we tell the user/installer to reboot the system, interrupt the boot loader, and add "single enforcing=0" to the command line. In other words, "boot to single user mode with SELinux in permissive mode".
Then we tell the user to insert the product CD and issue the
mount /dev/cdrom /media command in order to proceed with the installation.
In moving from a Red Hat Enterprise Linux 5 base to RHEL 6, an annoying problem popped up: the
The problem and the solution are both related to udev. Not knowing the innermost workings of udev, all I can describe is the visible indications that lead to the fix:
/dev/cdrom device disappeared when the CD was inserted. It was there before the CD went in, and it was gone afterward.The problem and the solution are both related to udev. Not knowing the innermost workings of udev, all I can describe is the visible indications that lead to the fix:
- Since
/dev/cdromis a symlink, the CD can still be accessed as/dev/sr0. - Once installation is complete and the system is booted to runlevel 5,
/dev/cdromis back and the problem never occurs again. - The fully booted system contains a file called
70-persistent-cd.rulesin <>code>/etc/udev/rules.d. This file was not there in single user mode. - There is an interesting script called udev-post in
/etc/init.d.
It became apparent that udev behavior is changed in RHEL6. This has something to do with "failed events" and persistent device naming. I repeated the installation of the base OS, booted to single user mode, and looked in
/dev/.udev/rules.d. Sure enough, there was a temporary file containing the persistent CD device naming rules, which is supposed to be moved to it's permanent place in the /etc/ hierarchy by udev-post.
But we boot into single-user mode, so no init scripts (more rightly called "upstart scripts" in RHEL6) are being started.
I went back and did a little research to compare runlevel S to runlevel 1 but I only came up with vague references as to the original SysV purpose of these guys. Some references even state that runlevel 1 is single-user mode. And that is essentially correct. Runlevel 1, in RHEL5 and RHEL6, simply starts the LVM monitor and then executes
It seems that something in UdevLand is a little broken in RHEL6. I believe this hack has gone away Fedora, or it's buried deeply in the various udev services of systemd. Anyway, for us, the upshot is that we will switch from single user mode as the initial state to runlevel 1 for product installation.
telinit S. Ah, but in RHEL6 they slipped a little fixer-upper: udev-post.It seems that something in UdevLand is a little broken in RHEL6. I believe this hack has gone away Fedora, or it's buried deeply in the various udev services of systemd. Anyway, for us, the upshot is that we will switch from single user mode as the initial state to runlevel 1 for product installation.
Wednesday, April 17, 2013
Systemd vs. SysV Runlevels: Why's the Network Down?
I recently installed Fedora 17 (the Beefy Miracle) on a server. The server hosts KVM virtual machines and Yum repositories, and provides PXE boot services. It's a pure network server and so there's no need for a graphical desktop.
For those you familiar with the traditional Unix SysV runlevels, you can probably guess which one I wanted to set as the default: three. Runlevel 3 is typically called "multi-user" with the implication that networking is enabled (for users to log in with) and no console GUI is provided.
Runlevels are pretty easy to understand. The
Starting with Fedora 15, the SysV init scripts have been slowly phasing out in favor of systemd "targets". If you've booted anything newer than F16 on a computer lately -- even a dog slow box -- you'll notice that it boots way faster than the older releases. That's largely because of the efficient and parallel nature of systemd.
Anyway, it took me a while to get my head around this new beast. It's more complex than ol' SysV init. But the developers did do some things to smooth the transition, one of which was to keep the concept of runlevels around.
I knew that the "target" concept was similar to runlevels. So, not wanting to dive too deep into systemd at the time, I Googled around a bit and found with this simple recipe:
I wanted runlevel 3, so I chose the multi-user.target answer. Easy enough.
I went on with my work and never actually tested this target. When the server came back up after a power outage, the network was down. After poking around on the console, I realized that the network service wasn't running, so I started it.
Then I dug into why it wasn't running in the first place and found that the network service wasn't even enabled. So I took care of that.
I verified that all was well by rebooting.
So, WTF? I don't know why networking isn't enabled in "multi-user" mode. Do you know?
For those you familiar with the traditional Unix SysV runlevels, you can probably guess which one I wanted to set as the default: three. Runlevel 3 is typically called "multi-user" with the implication that networking is enabled (for users to log in with) and no console GUI is provided.
Runlevels are pretty easy to understand. The
/etc/inittab file sets a default runlevel. The runlevels are basically a directories full of scripts (actually, symlinks to scripts) that run in a certain order. Each one does its part to bring the system up in a repeatable way.Starting with Fedora 15, the SysV init scripts have been slowly phasing out in favor of systemd "targets". If you've booted anything newer than F16 on a computer lately -- even a dog slow box -- you'll notice that it boots way faster than the older releases. That's largely because of the efficient and parallel nature of systemd.
Anyway, it took me a while to get my head around this new beast. It's more complex than ol' SysV init. But the developers did do some things to smooth the transition, one of which was to keep the concept of runlevels around.
I knew that the "target" concept was similar to runlevels. So, not wanting to dive too deep into systemd at the time, I Googled around a bit and found with this simple recipe:
Q: How do I change the default runlevel to boot into?A: The symlink /etc/systemd/system/default.target controls where we boot into by default. Link it to the target unit of your choice. For example, like this:# ln -sf /usr/lib/systemd/system/multi-user.target /etc/systemd/system/default.targetor# ln -sf /usr/lib/systemd/system/graphical.target /etc/systemd/system/default.target
I wanted runlevel 3, so I chose the multi-user.target answer. Easy enough.
I went on with my work and never actually tested this target. When the server came back up after a power outage, the network was down. After poking around on the console, I realized that the network service wasn't running, so I started it.
systemctl start network.service
Then I dug into why it wasn't running in the first place and found that the network service wasn't even enabled. So I took care of that.
systemctl enable network.service
I verified that all was well by rebooting.
So, WTF? I don't know why networking isn't enabled in "multi-user" mode. Do you know?
Tuesday, April 16, 2013
Displaying Highlighted XML Code in Blogger Like A Real Astronaut
Excerpt from the little-known Apollo 21 mission transcripts:
"Houston, this is Tranquility Base. We can put XML and other source code in our blog posts and it looks pretty cool. Over."
"Roger, Tranquility Base. We're pickin' up that code and it looks real nice."
I'm far from being any kind of XML or Web whiz kid, but this only took about 700 hours to figure out. If you Google things like "display code in blogger", you'll come up with a lot of hits. Most of them don't really hit the mark, so here's what I did, in an Austin Powers Nutshell.
- Look at Mike Samuel's Prettify.
- Edit your Blogger template HTML.
- Load Prettify just before the end of the body.
There! You can now insert code with syntax highlighting, optional numbers, etc.
<?xml version="1.0" encoding="UTF-8"?>
<device class="system" subclass="thin client">
  <manufacturer>Cisco</manufacturer>
  <product>VXC 6215</product>
  <subproduct/>
  <partnumber/>
  <cpu>AMD G-T56N</cpu>
  <memory>
    <capacity>4000</capacity>
    <installed>2000</installed>
  </memory>
  <storage type="flash">
    <capacity>4000</capacity>
  </storage>
</device>
If the code to be displayed is XML (as in the example above) you have a bit more work to do.
First off, the
<pre> and <code> tags are not enough to protect your XML from being processed by the browser. They'll disappear and leave you with just the element values, which is useless. You need to convert all the angle brackets to their HTML equivalents. It's obnoxious, but I couldn't find a way around it.So keep a link handy to a tool like Postify. This will "escape" all of the characters that will confuse a browser. Paste your code in (using the HTML tab -- not the Compose tab), copy the translated code out and into a
<pre class="prettyprint"> block.I had to do one more thing: fix the colors. The default colors don't work at all in my chosen blog template. I checked out the skin gallery and picked one called "Desert". It's pretty close to the Blogger template and to the Tango Dark theme I use in Emacs.
Just append that skin to the prettify loader you put into the template. Beware that the skin example on Mike's Google page contains an ampersand. Blogger will choke on that and demand a semicolon after the skin parameter. Just escape the ampersand with && and you're good to go.
I don't care for the HTML-style line numbering. I'd rather see numbers in the left margin, like Emacs' "line-num.el" or Vim's ":set number".
Friday, April 5, 2013
Mounting and Modifying Virtual Disk Images
If you use KVM virtual machines in your Linux environment, you may want to mount and examine or modify the contents of a partition on a virtual disk. Here's one way to do it.
The VM should be down for this procedure.
First, check to see that you have available /dev/nbd devices. Depending on how many you need, you can create more:
modprobe nbd max_part=16
Export the image and look for partitions. Use the full path name to the image.
qemu-nbd -c /dev/nbd0 /var/lib/libvirt/images/testbox.img
partprobe /dev/nbd0
mount /dev/nbd0p1 /mnt/qemu/p1
mount: unknown filesystem type 'LVM2_member'
See the section "Mounting Logical Volumes" below for that procedure.
qemu-nbd -d /dev/nbd0
Multiply the number under the Start column by 512 and you'll get the byte offset of the partition inside the file. You can use that number to mount a non-LVM partition.
To mount the first partition on a directory called /mnt/p1 in the example above:
The second partition is a logical volume, so you can't directly mount it. Instead, map that partition to a loopback device.
PV /dev/nbd0p2 VG VolGroup00 lvm2 [7.69 GiB / 0 free]
PV /dev/sda2 VG vg_scott-kvm lvm2 [135.47 GiB / 0 free]
PV /dev/sdb1 VG vg_scott-kvm lvm2 [951.78 GiB / 0 free]
vgchange -ay VolGroup00
# lvm lvs
LV VG Attr LSize [...]
# mount /dev/mapper/VolGroup00-LvRoot /mnt/some-root
So, it's pretty simple right? There may be some nuances that I'm not aware of, so chime in if your experience is different.
Here's a hacky bash module that provides two functions: the first is for attaching the logical volume to the loop device, and the second is for mounting the root volume. It's hacky because I cheated with global vars and replaced the actual cleanup code in my module with a comment. Those things should be fixed before adding capabilities to this code.
Cheers!
Getting to Partitions on QCOW2 Images
This condensed recipe applies to qcow2 disk images. The image partitions can be mounted on the host for read/write access using QEMU’s Network Block Device (NBD) server.The VM should be down for this procedure.
First, check to see that you have available /dev/nbd devices. Depending on how many you need, you can create more:
modprobe nbd max_part=16
Export the image and look for partitions. Use the full path name to the image.
You may need to probe for partitions but I haven't had to.
The qemu-nbd command will create an nbd device for each partition. For example, /dev/nbd0p1. You can try to mount one of these partitions now but, if the disk image belongs to a Linux guest, it may fail. Mount can't work directly with LVM partitions.
mount: unknown filesystem type 'LVM2_member'
See the section "Mounting Logical Volumes" below for that procedure.
Once you've finished with the image, reverse the order of the steps above. I don't know if it's actually necessary to deactivate the volume group, but you definitely should "disconnect" the QEMU block device after unmounting the partition:
Getting to Partitions on Raw Images
Raw disk images are just that: a binary disk image in a file. You can see the partitions with fdisk:
# fdisk -l /path/to/disk.img
Disk disk.img: 10.7 GB, 10737418240 bytes
255 heads, 63 sectors/track, 1305 cylinders, total 20971520 sectors
Units = sectors of 1 * 512 = 512 bytes
Sector size (logical/physical): 512 bytes / 512 bytes
I/O size (minimum/optimal): 512 bytes / 512 bytes
Disk identifier: 0x00068f41

   Device Boot      Start         End      Blocks   Id  System
disk.img1   *        2048     1026047      512000   83  Linux
disk.img2         1026048    20971519     9972736   8e  Linux LVM
Multiply the number under the Start column by 512 and you'll get the byte offset of the partition inside the file. You can use that number to mount a non-LVM partition.
To mount the first partition on a directory called /mnt/p1 in the example above:
mount -o loop,offset=1048576 disk.img /mnt/p1
The second partition is a logical volume, so you can't directly mount it. Instead, map that partition to a loopback device.
# losetup -f
/dev/loop1
# losetup /dev/loop1 disk.img -o525336576
Then you can apply the LVM procedures in the next section to get at the volumes.
Mounting Logical Volumes
To mount LVM partitions, the volume group(s) first need to be activated. There's some good info at David Hilley's blog, which I’ve simplified a bit here.First, scan the system for LVM block devices, also known as physical volumes. You'll see the PV's of the running system as well as the new NBD volumes.
# lvm pvscanPV /dev/nbd0p2 VG VolGroup00 lvm2 [7.69 GiB / 0 free]
PV /dev/sda2 VG vg_scott-kvm lvm2 [135.47 GiB / 0 free]
PV /dev/sdb1 VG vg_scott-kvm lvm2 [951.78 GiB / 0 free]
For this example, VolGroup00 is the guy we want to get to. A volume group is just that: a collection of logical volumes. The first step in getting to the LV's inside is to activate the volume group.
Scan the system for logical volumes. (Note that the lvm scan/list commands are picking up the LV devices on the host as well as the QEMU guest image.)
LV VG Attr LSize [...]
LvLogs VolGroup00 -wi-a--- 3.66g
LvRoot VolGroup00 -wi-a--- 3.59g
LvSwap VolGroup00 -wi-a--- 448.00m
lv_home vg_scott-kvm -wi-ao-- 48.84g
lv_root vg_scott-kvm -wi-ao-- 50.00g
lv_swap vg_scott-kvm -wi-ao-- 49.09g
lv_var vg_scott-kvm -wi-ao-- 939.31g
LvRoot VolGroup00 -wi-a--- 3.59g
LvSwap VolGroup00 -wi-a--- 448.00m
lv_home vg_scott-kvm -wi-ao-- 48.84g
lv_root vg_scott-kvm -wi-ao-- 50.00g
lv_swap vg_scott-kvm -wi-ao-- 49.09g
lv_var vg_scott-kvm -wi-ao-- 939.31g
The new logical volumes are now available as mountable filesystem devices. Take a look in /dev/mapper. The names of the device files there should be in the format VG-LV, where VG is the volume group name and LV is the name of the logical volume.
Once you are finished examining or modifying your logical volume, be sure to unmount it and deactivate:
# umount /mnt/some-root
# vgchange -an VolGroup00
# losetup -d /dev/loop1
So, it's pretty simple right? There may be some nuances that I'm not aware of, so chime in if your experience is different.
Here's a hacky bash module that provides two functions: the first is for attaching the logical volume to the loop device, and the second is for mounting the root volume. It's hacky because I cheated with global vars and replaced the actual cleanup code in my module with a comment. Those things should be fixed before adding capabilities to this code.
#!/bin/bash
cleanup() {
    echo "Cleaning up..."
    # unmount, deactivate volume group, detach loop device
}

# usage: setupRootPart /path/to/image
# return: loop device via global var loopdev

setupRootPart() {
    declare -g loopdev
    imagefile=$1

    offset_blocks=$(fdisk -l $imagefile | grep 8e.*LVM | awk '{print $2}')
    let offset=$offset_blocks*512
    loopdev=$(losetup -f)
    echo "Attaching $imagefile to $loopdev at offset $offset"
    if ! losetup $loopdev $imagefile -o $offset; then
        echo "Failed to set up loop device"
        cleanup
        exit 2
    fi
}

# usage: mountRootVol /path/to/mount/dir
# return: volume name via global var vol

mountRootVol() {
    declare -g vol  # global var to return volume name to the caller
    mountpoint=$1

    vol=$(lvm pvscan | grep $loopdev | awk '{print $4 }')
    vgchange -ay $vol
    [[ -d $mountpoint ]] || mkdir -p $mountpoint
    # TODO need smarter way to find voldev
    voldev=/dev/mapper/$vol-root
    [[ -L $voldev ]] || {
        echo "No $voldev"
        echo "Mapped vols:"
        ls -l /dev/mapper
        cleanup
        exit 3
    }
    echo "Mounting $voldev on $mountpoint"
    mount $voldev $mountpoint
}
Cheers!
References
Playing with initrd
Wanna mess around with a Linux initrd? Add some tools to help debug an install problem, maybe? The initrd image is a compressed root filesystem, so it's easy to change.
Note that this discussion is about initrd and not initramfs. The two terms are often used interchangeably, but the initramfs found in the /boot directory on newer editions of Fedora and Red Hat Enterprise Linux are a bit more complex than the initrd found in the isolinux directory of the install CD. I'll leave initramfs alone for now -- especially since I know very little about initramfs creation and dracut.
Let's assume you have an initrd.img file right in your home directory and you want to unpack it into a new directory called initrd. All you need to do is feed the image into to a decompressor and feed the output of that into an archive extractor:
mkdir initrd
Now you can jump into the new initrd directory and start exploring. Say you want to drop the strace command in:
cd initrd
cp /usr/bin/strace bin
When installing binary executables, you'll need to include any and all shared libraries that it depends on. You can find this out by running ldd against the executable.
When you're satisfied with your changes, repack the file tree.
cd initrd
find | cpio -co | gzip -9 > ../initrd-debug.img
Or, for newer distros:
cd initrd
find | cpio -co | lzma > ../initrd-debug.img
Note that I specified a new name for the resulting image. It's optional. I like to keep the original where it was and distinguish the modified version by giving it a new name.
That's all there is to it!
Note that this discussion is about initrd and not initramfs. The two terms are often used interchangeably, but the initramfs found in the /boot directory on newer editions of Fedora and Red Hat Enterprise Linux are a bit more complex than the initrd found in the isolinux directory of the install CD. I'll leave initramfs alone for now -- especially since I know very little about initramfs creation and dracut.
Let's assume you have an initrd.img file right in your home directory and you want to unpack it into a new directory called initrd. All you need to do is feed the image into to a decompressor and feed the output of that into an archive extractor:
mkdir initrd
zcat /boot/initrd.img | $(cd initrd; cpio -id)
That will work for RHEL5 or CentOS 5, but they changed the compression algorithm from from LZ77 to LZMA for RHEL/CentOS 6 and newer editions of Fedora. (Someone remind me which Fedora that change was made.) That means you need use the "lz" commands instead of the "z" or "gz" commands.
mkdir initrd
lzcat /boot/initrd.img | $(cd initrd; cpio -id)
Now you can jump into the new initrd directory and start exploring. Say you want to drop the strace command in:
cd initrd
cp /usr/bin/strace bin
When installing binary executables, you'll need to include any and all shared libraries that it depends on. You can find this out by running ldd against the executable.
When you're satisfied with your changes, repack the file tree.
cd initrd
find | cpio -co | gzip -9 > ../initrd-debug.img
Or, for newer distros:
cd initrd
find | cpio -co | lzma > ../initrd-debug.img
Note that I specified a new name for the resulting image. It's optional. I like to keep the original where it was and distinguish the modified version by giving it a new name.
That's all there is to it!
Thursday, April 4, 2013
Create an ISO volume on a remote KVM server
I have a Fedora 17 KVM server that I access remotely with virt-manager. I usually do network installs of Linux guest VM's, but today I needed to actually boot a VM from an ISO image. After several fruitless Google searches, here's what worked.
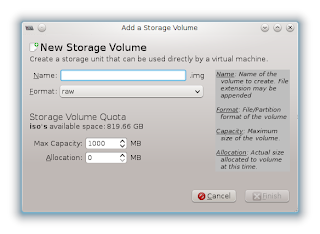 First off, the virt-manager GUI does not enable the Browse Local button when accessing a remote server. So I needed to get the ISO image into a libvirt storage pool. Creating the pool is simple, but adding an ISO volume isn't obvious. In the Storage tab of the Connection Details dialog, you simply select a pool on the right and then select New Volume.
Update: raw images work just as well as iso, so you accepting defaults (raw format, suffix "img") should work.
 First off, the virt-manager GUI does not enable the Browse Local button when accessing a remote server. So I needed to get the ISO image into a libvirt storage pool. Creating the pool is simple, but adding an ISO volume isn't obvious. In the Storage tab of the Connection Details dialog, you simply select a pool on the right and then select New Volume.
The problem is that Format doesn't have an ISO option. Some web pages do show pictures of "iso" appearing there but mine doesn't have it.
Update: raw images work just as well as iso, so you accepting defaults (raw format, suffix "img") should work.
So I used virsh to do it. Here are the steps. For this example, let's assume there is a pool called iso and an ISO image at /tmp/my.iso.

- Log on to the KVM server with ssh. You'll need sudo privilege or the root password.
- Transfer the ISO image from wherever it is to any directory on the server.
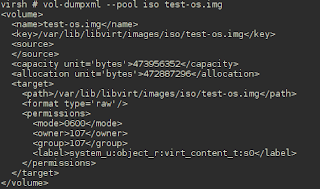
- Create an XML template for the new volume. Use virsh vol-dumpxml to get the XML of an existing volume.
- Paste the XML into a text editor, and change the name, key, and target path. I used os-install.iso as the name of the volume.
- Make sure the capacity is equal to or larger than the ISO image.
Change the format type to iso.This step is confusing. qemu-img create doesn't accept 'iso' as a format and the vol-create command below fails it you try to use it. Yet, the type does appear as iso in virt-manager's Storage dialog.- Save the file as ~/test-os.xml
- Create a new volume:
virsh vol-create --pool iso --file ~/test-os.xml - Load the contents of the ISO into the new volume:
virsh vol-upload --vol os-install.iso --pool iso --file /tmp/my.iso
That's it. You should be able to connect any guest CD-ROM device to this ISO from a remote virt-manager session.
Friday, March 29, 2013
A Frank Introduction
Greetings!
I created this blog to share what I know about computer engineering. It's not my first blog, but the other one is personal, random, and infrequently updated. This one will be professional, random, and infrequently updated.
There is so much helpful information out there on the Web that I feel the need to give some back. I don't expect My Stuff to bubble up into anybody's Google-page-1 search results, but maybe -- just maybe -- I can bail out that person who's in a jam and needs a tip. I'll also jabber uselessly about related topics and generally wander around in the fashion of an ADHD techie, as I'm sure you're expecting by now.
Speaking of introductions, I'm a Linux systems engineer living in the Washington DC metro. I am proud to say that I've been employed in this field after getting nothing better than a two-year vocational degree in electronics back in 1982. Maybe sometime we'll talk about the luck of the draw and being in the right place at the right time.
Until then, thanks for the skim! Next, I'll be discussing the memories from my first technical interview in ten years, I'm not counting the one I should have had but didn't have for my current job.
Cheers!
Oh! The name of the blog. I'll explain.
Really, I'm the eternal rookie at everything I do. There's no getting around it. I'm fascinated by how things work and I love to learn, but I really never attained that critical level of focus, understanding, and achievement that truly distinguishes the master from the apprentice. I am gifted with only modest intelligence. That, combined with insatiable curiosity and a desire to be creative, results in a willing and not completely stupid amateur.
Subscribe to:
Posts (Atom)